Please also go through the steps on the Leasing Trello card under the tenant secured section
Any applications processed should be presented to the landlord with a recommendation on the application you feel is best suited to their property but, ultimately, it is the landlord’s decision.
Before ringing the landlord:
Call the applicant to advise their application has been finalised and is ready to be presented to the landlord. Check if they are still interested in the property. If not, update the status of the application on IRE as "withdrawn". (Nothing worse than getting approval from the landlord only to find the tenant is no longer interested)
Make sure you are prepared and have all information at hand so you can refer quickly if they ask any additional questions.
Discuss key points such as previous living arrangements, rent, lease period, pets, number of occupants and who they may be.
Ensure that there is sufficient gap between the previous tenant and the new tenant for all maintenance and cleaning to be completed before the new lease starts. (this should be a minimum of 5 business days)
Adding Tenancy Details into Property Tree
Step 1: Property Tree will integrate with IRE and transfer over the approved tenant/s details as a new tenant for the property. To do this you will need to go to IRE, open the application, go to the top right hand corner and change the 'Status' to Approved - Magain City Realty. Go to Property Tree to check the tenant/s details have transferred over, and then go back to IRE and change the 'Status' to Awaiting Payment - Magain City Realty. If the integration is not working, please proceed with the steps below.

Step 1: The first step is to enter the tenant's details into Property Tree so that a unique reference code is created for payments. This code needs to be relayed to the tenant in order for them to pay their deposit to secure the property.
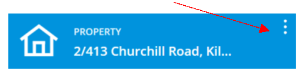
Step 2: From the property profile, click on the 3 dots and select "Add Tenancy"
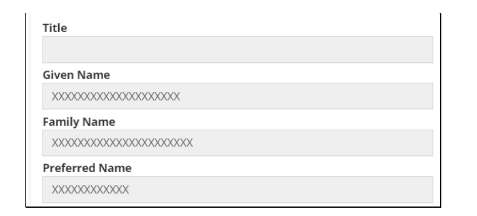
Step 3: Type in all tenant's names

Step 4: Enter "Lease Structure Details" e.g. length of lease, if pets are allowed
Step 5: Contact Information
Click on + to enter the tenant's name (if multiple tenants, this needs to be done individually). Do not enter title or middle names
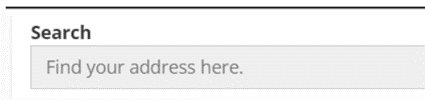
Step 6: Address
Start typing the property address in the search field. The system will automatically search the address and prefill the fields. If the address doesn't come up in the search bar, it can be manually entered making sure the correct information has been put into the correct fields.
Step 7: Contact information
Enter mobile numbers and email address
Step 8: Preferred contact method
Tick auto email receipts and auto email invoices
Step 9: Contact type is Tenant
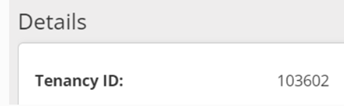
A tenancy ID number is then created against the tenant profile. This number is used as their reference number for rental & invoice payments.
Congratulations email to tenant from IRE
Step 1: Log onto App Tracker through IRE
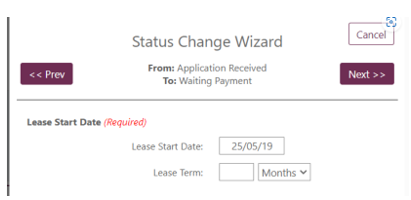
Step 2: Locate the application and scroll across to "App Status". Change the status to "Awaiting Payment - Magain City Realty"
Step 3: Status Change Wizard appears on the screen - click on "Next"
Step 4: Insert start date and term of lease
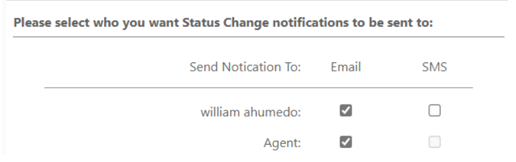
Step 5: Select email option for applicants and agent
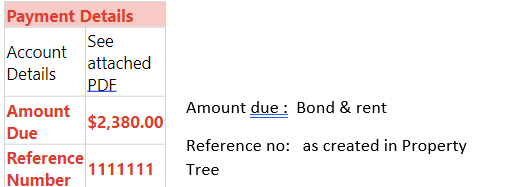
Step 6: Check that the Westpac bank account details has been attached through the attachment tab.
Step 7: On right hand side of the screen, carefully work through the screen, filling out all details regarding the tenancy
Step 9: Insert the tenant reference number (as created from Property Tree) & changing the amount due in line with the bond & 2 weeks rent payable.
Step 11: Review all content before sending
The Deposit has been paid - what next?
Funds will be receipted to "withheld funds" in Property Tree. To allocate the funds, you will need to convert the applicant from a prospect.
Step 1: Open the tenant profile
Step 2: Click on the 3 dots to provide an “Action” list and click on “Convert Prospect”. (If IRE transferred over the tenant details automatically then the prospect tenant will already be converted.)

Step 3: Update the remaining tenancy details so the withheld funds can be allocated
Complete the tenancy details by clicking on the edit pencil at the top right-hand side of “Lease & Rent Information”
Lease information
Original lease start date is the date the tenancy starts. This date remains the same for the duration of the tenancy.
Lease start date – initially this is the same as the original lease start date but will change when the lease is renewed.
Lease end date – as per the tenancy agreement
Duration of tenancy – this relates to the term of the agreement in weeks
Current rent – is the fortnightly rent payable
Paid to date – this should default to the date before the tenancy starts, but best practice is to check
Effective paid to date – will default to the same date as the Paid to Date.
Tick “charge tenant’s water” unless water charges do not form part of the lease
Click on "Save"
Bond details
Scroll down to “Bond & Deposits” and click on the edit pencil
Select “Residential Bond” from the drop down menu
Enter the required amount of bond. In the description say Bond = 4/6 weeks rent cash or HSA
Click on "Save"
Step 4: Allocate held funds towards rent by selecting the tenant card. The bond & first week’s rent will be visible in the held funds under the Tenant Profile
Click on 3 dots to view the Action list
Select “Allocate Held Funds”
Enter the amount you wish to allocate to Rent next to the Rent description and the amount you wish to allocate to Bond
Make sure the amount receipted at the bottom of the screen matches the available funds held at the top of the screen.
Click on "Create Allocation"
Step 5: Charge landlord fees for advertising & letting
These are usually correct, but it is a good idea to confirm by checking the management agreement. NRAS fees are not reflected in a management agreement as we have increased the percentage to allow for market rent. The letting fee for NRAS properties is to be calculated on the full market rental for the property, not the reduced rental figure.
Click on "Save"
Send deposit received email to tenant
Template in Property Tree - (Residential) Tenancy Secured > Tenant > Deposit Received
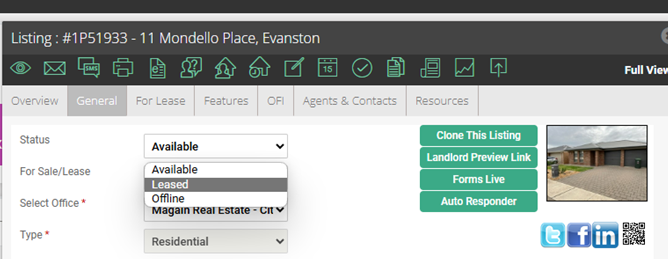
Agent Box - mark the property as leased
Log into Open Agent Box
Search property address and select active listing
Click on the “General” tab
Under “Status” – Click “Leased”